Our Kitchen... The Heart of the Home
Kitchen before cabinets
Ode to my kitchen....How do I love thee, let thy count the ways... yes I do feel like my kitchen is poetry. It is where many hours are spent preparing and cooking food for my family and friends. Where good conversation and plans are made. And coffee... yes where my coffee is made everyday! Can not start a day without my cup of coffee! But being married to an Englishman you can always find a good pot of tea brewing too! I love my kitchen and don't forget...I get morning sunshine too because my house faces East.
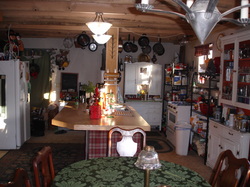
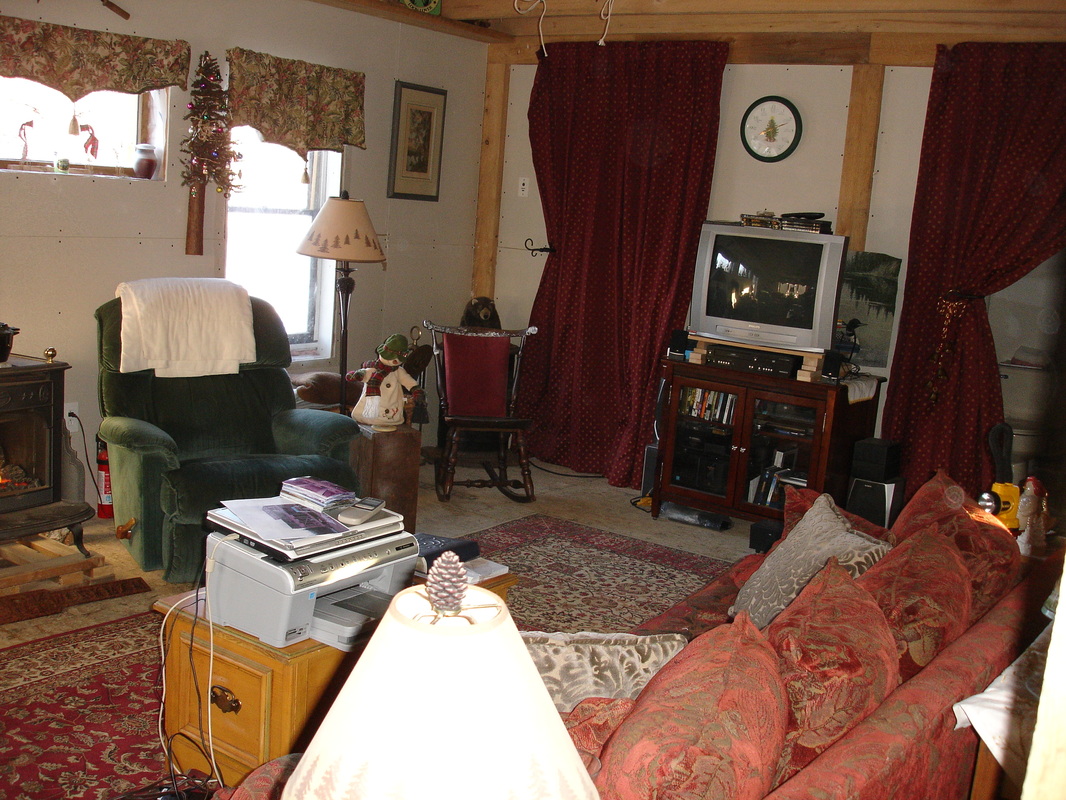
We really didn't have any specific plan on the interior of the house.. we just knew where the rooms were situated. Thanks to Mom and Bob again, we had a Hoosier cabinet as well as a homemade cherry cabinet to use for glassware, food storage and counter space. I should also mention that thanks to Mom and her daily walks, she found a house near her that was remodeling their kitchen and were throwing away the old cabinets... can you believe it? Well one man's junk so they say...is another one's treasure! And she grabbed them all and brought them back to her house until we could get to Connecticut to pick them up. We installed them towards the end of winter and compared to the picture above it transformed it completely. We opted to leave the ceilings open to the beams to allow for heating to go up stairs but to also give it a rustic kind of farm look. I was able to hang my pots and pans from the beams which also turn into flower drying beams in the summer. Again lights were found at a yard sale and the rest we had acquired from our 23 plus years of marriage. Except of course the stove which we purchased as it had a pilot lit oven so we could use it without power. My all time dream stove is a Viking or Garland, you know the ones you find in the restaurant trade with the 6 burners, griddle, broiler and double oven...ahhhh... someday.. (sorry I got off track there for a minute). But seriously, in this build we did the bare minimum so that we could survive, prepare a meal, wash up the dishes and store food. It amazes me how a few things like curtains and a few knick knacks can transform an unfinished room into a magazine cover! Or it did to me anyways after living in a trailer for 6 months.
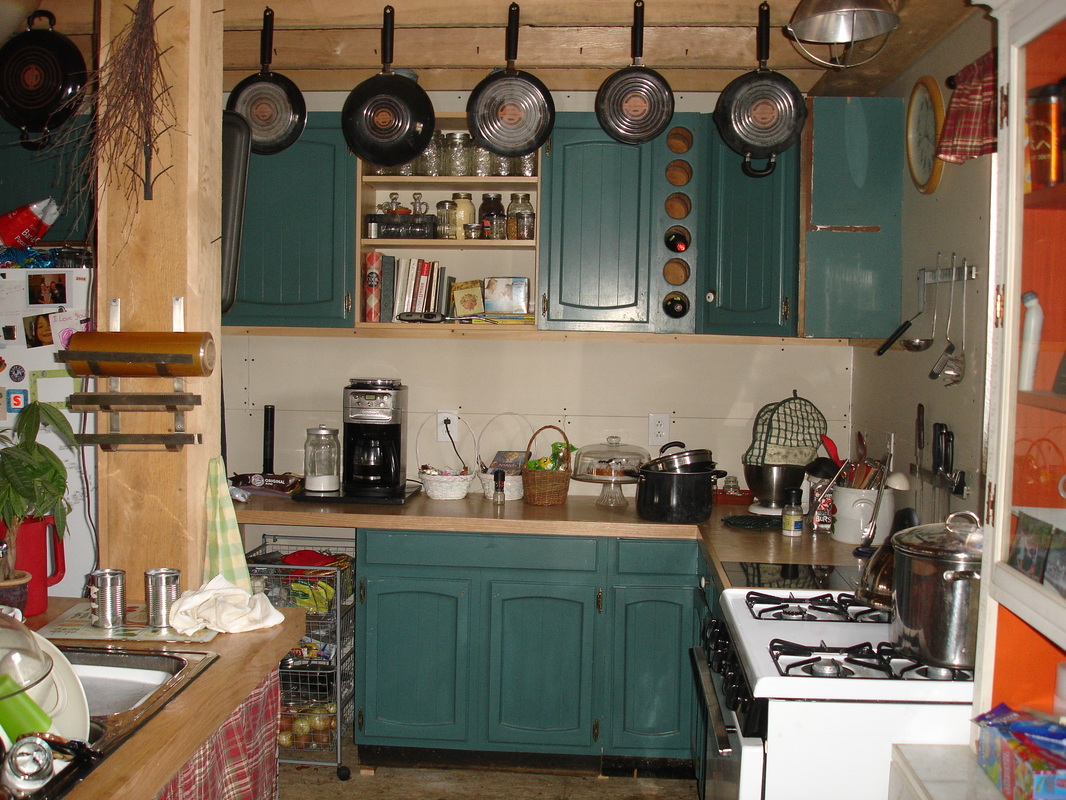
The center island was an ingenious idea that Jonathan came up with to allow us to have the sink in the center of the room versus the outside wall. This means we are less likely to have a freeze up. It also allows whomever is washing dishes to see everyone in the house as you are actually facing the rooms instead of having your back to them. We have now acquired some stools for the bar side of the island (Mom and Bob again) so the kids have somewhere to do homework or have a quick meal. I should mention the down fall to islands.. they are like any surface in the kitchen they become magnetic... what I mean by that is they collect everything and anything on top of it.. papers, cups, books. snack wrappers.. you name it, it ends up on the island. But hey I can deal with cleaning it off just if you come to visit and it is covered with junk it is the magnets fault not mine.
We really didn't have any specific plan on the interior of the house.. we just knew where the rooms were situated. Thanks to Mom and Bob again, we had a Hoosier cabinet as well as a homemade cherry cabinet to use for glassware, food storage and counter space. I should also mention that thanks to Mom and her daily walks, she found a house near her that was remodeling their kitchen and were throwing away the old cabinets... can you believe it? Well one man's junk so they say...is another one's treasure! And she grabbed them all and brought them back to her house until we could get to Connecticut to pick them up. We installed them towards the end of winter and compared to the picture above it transformed it completely. We opted to leave the ceilings open to the beams to allow for heating to go up stairs but to also give it a rustic kind of farm look. I was able to hang my pots and pans from the beams which also turn into flower drying beams in the summer. Again lights were found at a yard sale and the rest we had acquired from our 23 plus years of marriage. Except of course the stove which we purchased as it had a pilot lit oven so we could use it without power. My all time dream stove is a Viking or Garland, you know the ones you find in the restaurant trade with the 6 burners, griddle, broiler and double oven...ahhhh... someday.. (sorry I got off track there for a minute). But seriously, in this build we did the bare minimum so that we could survive, prepare a meal, wash up the dishes and store food. It amazes me how a few things like curtains and a few knick knacks can transform an unfinished room into a magazine cover! Or it did to me anyways after living in a trailer for 6 months.
The center island was an ingenious idea that Jonathan came up with to allow us to have the sink in the center of the room versus the outside wall. This means we are less likely to have a freeze up. It also allows whomever is washing dishes to see everyone in the house as you are actually facing the rooms instead of having your back to them. We have now acquired some stools for the bar side of the island (Mom and Bob again) so the kids have somewhere to do homework or have a quick meal. I should mention the down fall to islands.. they are like any surface in the kitchen they become magnetic... what I mean by that is they collect everything and anything on top of it.. papers, cups, books. snack wrappers.. you name it, it ends up on the island. But hey I can deal with cleaning it off just if you come to visit and it is covered with junk it is the magnets fault not mine.
The kitchen after the cabinets were installed
The Dining Room
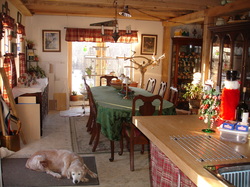
View of Dining Room from Kitchen
Also facing East and South as well is our dining room - really just an extension of the kitchen. I was able to re-use curtains and kept my woodland theme going - bears, moose, racoons, owls, deer..you name the woodland animal and I probably have it somewhere in the house. With the open beams we were able to attach a board at the top of the walls which created a shelf along the ceiling to place our antique kitchenware, bowls, containers, vases and yes even some teapots! A few years ago we went to auctions. I love a good auction! And our dining room set is actually one of my better buys - 6 chairs, the table and large glass door hutch all for $100! We have two doors (windows) at the far end of the room. This is where our future door to either the attached greenhouse will be or the door to an outside deck. We haven't planned that out totally yet, but I am voting on the greenhouse to allow more solar passive heating during the winter months. Not to mention the Parrots love to be in that window so they can sun themselves and watch their outdoor feathered friends eating at the feeders.
The Living Room
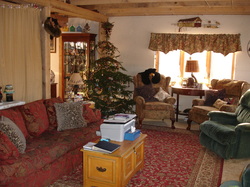
Living room facing South
The first floor of the house is all open concept, so all the rooms open into each other. The walls are all drywall and the ceilings are all open beams. We have the same shelf theme going that we had in the Dining Room area except in the living room we have Jonathan's antique tools and I have garden themed knick knacks. Yes they are all glorified dust collectors but it is nice to look into each cubby area and see a different theme. It was amazing how everything we owned fit perfectly into the house. The living room is the only room so far that we have actually finished the walls using joint compound, sanding them and putting a coat of primer on it. We figure we have the rest of our lives to figure out a color to use, so for now, the white is good.
Living Room facing North - two curtains close off the utility room and the downstairs bathroom - before doors
Stairs...
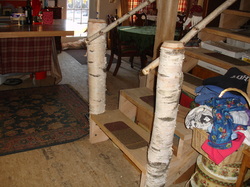
Birch posts and railings cut from the property
Another Jonathan original, is our birch posts at the bottom of the stairs. This birch tree came from the land and tied in nice with our woodland theme. The rails are also birch saplings that were cut down during the clearing of the land. The stairs are just temporary but that being said you know they will be there for many years to come. Now I have to give credit where credit is due.. when Jonathan brought home the tree to make into the banister posts I cringed thinking they were way too big. He kept insisting that it would look great when it was done. And I have to say, I am very happy I let him win that one! As they are aging, the bark still remains intact and the rails have become smoother as our hands are naturally sanding the bark down with the many trips up and down the steps.
The Second Floor...
Our house is 32 feet x 32 feet - so an exact square. What we opted to do on the second floor is make 4 bedrooms and another bathroom. We were first going to make it a full bath with toilet, sink and shower - but as cost was a big factor, we opted to make it a half bath with just a toilet and sink - this allowed us to make a linen area where we have shelves for all of our bedding and towels. The top of the stairs will still have birch railings when we have time to finish it. Priorities were still getting everyone in rooms and back to a normal routine as soon as we could. Abbie and Ariana are sharing a room above the Living room, Ben is over the kitchen and our Master bedroom is above the Dining room. We do have the 4th room but for now it is our storage area - soon to be a playroom for the kids.
Girls Room
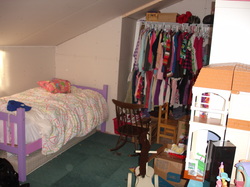
Abbie and Ariana wanted to share a room still. So we actually finished their room first and to date is the only room that has a door on it! The ceilings are all the roof line so it made furniture placement interesting to say the least. Of course the room didn't look like this for long... soon posters and pictures filled the walls as well as toys scattered across the floor. You would think a small room would be easy to keep clean but they haven't mastered that concept yet.
Ben's Room
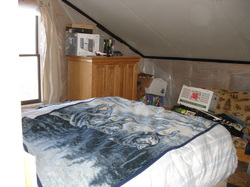
Ben's bedroom
What can I say, Ben is a typical boy. Loves to be away from it all in his cocoon of a room. There will be a future window behind the futon in this picture. It was getting so cold we opted to not put the eyebrow windows in the front of house until spring/summer. When we finally put them in it made a world of difference with the amount of light we had coming in. This room still needs drywall put up. The only drywall up on the second floor is a single layer (one side of the wall) in between everyone's rooms. We figure we still need another 60 sheets in order to finish it all. To date we have bought and hung around 120 sheets so far. That is quite a few - you forget how fast they add up when you are starting from bare walls.
Master Bedroom
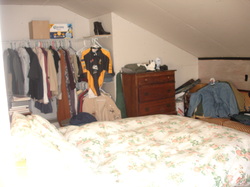
Master bedroom
To say it was the nicest feeling the first time we got to sleep in our own bed in our own bedroom is an understatement. Our windows face East and South so no matter what time of year we see the sunrise. I also have the added luxury of seeing my garden that we put in during the summer months. Sometime in the future, our closets will all have doors and the walls will have paint. For now it is just nice to have a place to call our own.
To continue with Updates to building a house, click here
