Let's Make Soap - Cold Process
Lavender Citronella Bug Soap
Now I don't want everyone to think that I am an expert by any means... I have only made a few batches of soap so far with good results so I must have done something right. This is only what I have learned so far and want to pass it on to anyone else with an interest in how to do it. I found a lot of information on the web watching tutorials on you tube, reading books as well as online resources who all answered different questions I had at different times. What I am doing here is trying to compile what I have learned in one place so that anyone reading this can assemble the ingredients and make soap for home use. Now if you are looking to start a soap business - there are many techniques out there that I will not be covering as most soap makers have their "secrets" of the trade that they rarely share. If you happen to find one then I would bookmark it for later use as I didn't and now can not find some really neat tricks I had wanted to try out. Live and learn so they say...
So let's assume that you have found a great recipe for soap, all your ingredients are assembled and you are all ready to go...
Step 1 - Measure out all ingredients using your scale and recycled plastic containers. When measuring lye out please remember to put your gloves and goggles on in case it gets on your skin or in your eye. Now I used a lidded plastic container for lye - placed the empty container on the scale pressed the tare button to return the scale back to 0 and measured the lye to the amount called for in the recipe. I then removed the container and put the lid on it putting it to the side until I was ready for it. This keeps it safe and out of harms way while you are measuring the rest of the ingredients. When I finished with it I wrote on the lid "LYE" using a sharpie so that I know to just use this container for the lye in the future. Saves on having chemical reactions when you don't want them. I used one of the glass pyrex bowls for the distilled water, also measured on the scale, so that all I needed to do when ready is mix the lye into the water. (Caution: you always want to add the lye to to water not the water to the lye so the water does not splash up and burn you or your clothing). All ingredients are pre measured using the scale - separately in their own plastic container to make sure you have everything ready just like in cooking or baking.
When working with some types of oils they will be in solid form. This is normal for the cold state so heating of the oil will be necessary. Hence the large stainless steel soap making pot! I am lucky here as my oven is pilot lit (stays right around 100 degrees F) so if I know I am going to make soap I place any solid oil containers in the oven for a while and when I go to make the soap they are in liquid form or near enough so that they easily pour out of the containers for measuring on the scale. If you do not have this luxury you may opt to scoop it out using a spoon - it all weighs the same in liquid or solid form. You can even place the container in the microwave to melt it some. I do not like using microwave ovens so this isn't an option for me. If you do please be careful not to boil the oil as it will not only take away some of the good key ingredients in the oil, but may also burn you. Don't forget when oil is heated too hot it turns into an acid so you do not want to make acid soap!
Step 2 - Mixing the lye and water. As I mentioned above please wear all protective gear when working with the lye so basically from start to finish of soap making you will be wearing stylish goggles and rubber hands :) I recommend placing the candy thermometer into the distilled water prior to adding the lye that way you can adjust it as needed without worry of getting burned. I clip mine right on the side allowing the tip of the thermometer to sit in the water about an inch or so from the bottom (1/2 way into the liquid) with the numbers facing where they can be easily read and it will stay there until I am all done. Now I slowly pour the lye into the water. Please do not stand over bowl whilst pouring it as the chemical reaction is instant and the fumes will rise very quickly into the air. Even standing away from it you will be able to smell it and have a slight burning sensation in your nose (make sure you are in a ventilated area). Using your heat resistant spatula, slowly stir the lye water until all solid beads are dissolved. Only takes a few seconds. And Don't forget to check the temperature on the thermometer! You will be amazed at how fast the water heats up to above 160 degrees F! Now set this aside and allow to start cooling.
Step 3 - Heating the base oils - (not essential oils only base oils - essential oils are not added until after trace is reached towards the end of the process). Let's assume that all oils are both liquid and solid form, all pre-measured and are ready to go in their containers. You will simply put all of them together into the pot used for soap making and using a low heat on the stove, heat it until everything is melted and combined. Here I use my stainless steel spoon or I rinse my spatula that I mixed the lye in and use that. Now the idea is not only to melt the solid oil but heat the oils until they are near a temperature close to the lye/water mixture.
I have seen many different soap makers do one of three things - either wait until the lye cools down to 100 degrees and the oil is 100 degrees before adding them together which can take a while, or heating the oil to within 5-10 degrees of where the lye is heated to which can be upto 130 degrees - or put the lye bowl into ice water dropping it down to 95-100 degrees (so it speeds up the process of just waiting) and then adding the lye water to the 100 degree oil. I am not sure which technique is best I opted to go with heating my oil to within 5 to 10 degrees of the lye water then mixing them together. I did this as I watched a woman who has been making soap for over 20 years and she had her lye water and added each oil individually into the lye water allowing its heat to melt the solid oils vs. doing it separately. Kind of saving the step of actually heating it. I didn't feel confident to just do that this time but maybe next time I will.
Step 4 - Now comes the fun part! Take your spatula and stir stir stir! I stir like I am mixing batter, kind of like the "S" method of stirring. This is where the hand blender works well as you are waiting for the saponification to occur which will change the lye over to soap. This is seen by having a bit of the mixture sit on top for a second before sinking back into itself thus the trace name as just a trace of the mixture sits on the surface - which means it is combined. The hand method takes longer and I believe having the temperature start higher also makes the stirring process take longer. If I had added the oil and lye at a lower temperature I may not have had to stir so long as it is already cooler and will combine easier (just a guess). The hand blender mixes faster of course and will cut the stir time by quite a bit by the videos I have watched on it. I am not planning on becoming a soap manufacturer just making enough for us to use and maybe some gifts, so hand stirring is ok for me right now. So just keep stirring!
Step 5 - So you have trace? Yipee! How does your arm feel? Mine was tired about now and I kept thinking is that it? Is that it? I probably could have stirred longer and kept second guessing but after 1 1/2 hours I was toast! Now it is time to flavor your soap! For my first soap I made the shampoo bar so I added tea tree oil, lavender oil, and lemon oil (since I didn't have grapefruit). It also called for a lot of it - like almost 1 gram of each! My bottles only had like .5 so I added what I had and figured it just won't be that smelly! Give this all a good stir - yup you aren't done yet! Until it is well blended - I did it for another 5 minutes or so. Now it was time to pour the soap into my two silicone bread loaf pans. I should mention here that if you do use something other than silicone for your mold, you will need to line the mold with plastic wrap - this allows you to remove the soap after it has cured easily and keeps the oils from saturating the wood if you are using a wooden mold.
Step 6 - Baking off the soap - Now that the soap is done and you have poured it into a mold you will need to cover it with plastic wrap and I also cut a piece of cardboard the exact size of the loaf pan to act as a lid and add a little more insulation while the soap is curing. I placed the containers on a solid moveable surface (I used a tray) and once the soap was covered I then wrapped the whole thing in the old towels to help keep in the warmth but allow the soap to slowly cool down the rest of the way and set. They need to remain this way for 24 hours to let this process take place. I had mine just on the kitchen counter wrapped up and it was fine.
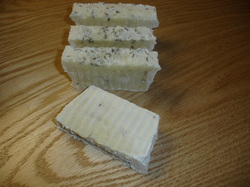
Step 7 - After the Cure - Now that you waited the 24 hours it is time to remove the soap from the molds and slice to the desired thickness of your bar soap. You can buy soap molds that already have cuts in them that will score the soap, marking it so they are all exactly alike. Or even buy the figure molds that are like the home made chocolate molds that will only need to be popped out and dried. But these can be expensive and really why spend on something that you will only use every once in a while. If you want to make large quantities them maybe the investment will be worth it. My soap is for home so I cut it by eye - I used a french fry cutter for the wavy edges just to give it some "Style".
My soap was kind of solid but still soft almost like cream cheese - spreadable but will still hold it's shape - it held together and when I placed it on the drying racks it was fine it didn't ooze through the surface. It also kept the wavy cut so I figure it is good. No one really says much about consistency when I have watch the videos - as long as it doesn't separate in the mold (oil and water separate) or crumble when you take it out then you did everything right. So now the last and final part of the soap making process.. I hope you are wearing your patient panties today...
Step 8 - The soap needs to dry and finish curing which will take anywhere from 3 - 6 weeks. Say what! Yup you can't use it prior to that as the lye is still active and you need to wait for the rest of the water content to evaporate out of the soap. So you may ask - when do you know it is done? Well, mine is still drying...and the same woman who mixes her oils into her lye water says her sure way of knowing it is done is by tasting it :) LOL I know who wants to taste the soap. But she swears by it. If you just touch the soap with the tip of your tongue and it has no burning sensation at all then the soap is ready. Kind of like if you ever tested a battery with your tongue to check if it was good (come on I know some of you have done this). Same thing kind of - nasty but it won't hurt you. If you really don't want to taste it then I would wait at least the 4 weeks before use as that is the general rule of thumb of how long to wait.
That's it folks! My 8 step process of how to make soap Burrows style. Again I can't guarantee that this process doesn't have flaws in it and my best advice for that would be to please research it for yourself. See what works best for you. I had fun making it and now I have shampoo soap as well as a citronella lavender soap that I think will be fantastic for bug season! This will be great as gifts in a nice little package and I hope that someday soon we can even have our first blog follower giveaway! Stay tuned for that! (ps pictures of the steps will be added once I make another batch - I wasn't that organized the last time I made it to think about taking pictures of each step) sorry :)
So let's assume that you have found a great recipe for soap, all your ingredients are assembled and you are all ready to go...
Step 1 - Measure out all ingredients using your scale and recycled plastic containers. When measuring lye out please remember to put your gloves and goggles on in case it gets on your skin or in your eye. Now I used a lidded plastic container for lye - placed the empty container on the scale pressed the tare button to return the scale back to 0 and measured the lye to the amount called for in the recipe. I then removed the container and put the lid on it putting it to the side until I was ready for it. This keeps it safe and out of harms way while you are measuring the rest of the ingredients. When I finished with it I wrote on the lid "LYE" using a sharpie so that I know to just use this container for the lye in the future. Saves on having chemical reactions when you don't want them. I used one of the glass pyrex bowls for the distilled water, also measured on the scale, so that all I needed to do when ready is mix the lye into the water. (Caution: you always want to add the lye to to water not the water to the lye so the water does not splash up and burn you or your clothing). All ingredients are pre measured using the scale - separately in their own plastic container to make sure you have everything ready just like in cooking or baking.
When working with some types of oils they will be in solid form. This is normal for the cold state so heating of the oil will be necessary. Hence the large stainless steel soap making pot! I am lucky here as my oven is pilot lit (stays right around 100 degrees F) so if I know I am going to make soap I place any solid oil containers in the oven for a while and when I go to make the soap they are in liquid form or near enough so that they easily pour out of the containers for measuring on the scale. If you do not have this luxury you may opt to scoop it out using a spoon - it all weighs the same in liquid or solid form. You can even place the container in the microwave to melt it some. I do not like using microwave ovens so this isn't an option for me. If you do please be careful not to boil the oil as it will not only take away some of the good key ingredients in the oil, but may also burn you. Don't forget when oil is heated too hot it turns into an acid so you do not want to make acid soap!
Step 2 - Mixing the lye and water. As I mentioned above please wear all protective gear when working with the lye so basically from start to finish of soap making you will be wearing stylish goggles and rubber hands :) I recommend placing the candy thermometer into the distilled water prior to adding the lye that way you can adjust it as needed without worry of getting burned. I clip mine right on the side allowing the tip of the thermometer to sit in the water about an inch or so from the bottom (1/2 way into the liquid) with the numbers facing where they can be easily read and it will stay there until I am all done. Now I slowly pour the lye into the water. Please do not stand over bowl whilst pouring it as the chemical reaction is instant and the fumes will rise very quickly into the air. Even standing away from it you will be able to smell it and have a slight burning sensation in your nose (make sure you are in a ventilated area). Using your heat resistant spatula, slowly stir the lye water until all solid beads are dissolved. Only takes a few seconds. And Don't forget to check the temperature on the thermometer! You will be amazed at how fast the water heats up to above 160 degrees F! Now set this aside and allow to start cooling.
Step 3 - Heating the base oils - (not essential oils only base oils - essential oils are not added until after trace is reached towards the end of the process). Let's assume that all oils are both liquid and solid form, all pre-measured and are ready to go in their containers. You will simply put all of them together into the pot used for soap making and using a low heat on the stove, heat it until everything is melted and combined. Here I use my stainless steel spoon or I rinse my spatula that I mixed the lye in and use that. Now the idea is not only to melt the solid oil but heat the oils until they are near a temperature close to the lye/water mixture.
I have seen many different soap makers do one of three things - either wait until the lye cools down to 100 degrees and the oil is 100 degrees before adding them together which can take a while, or heating the oil to within 5-10 degrees of where the lye is heated to which can be upto 130 degrees - or put the lye bowl into ice water dropping it down to 95-100 degrees (so it speeds up the process of just waiting) and then adding the lye water to the 100 degree oil. I am not sure which technique is best I opted to go with heating my oil to within 5 to 10 degrees of the lye water then mixing them together. I did this as I watched a woman who has been making soap for over 20 years and she had her lye water and added each oil individually into the lye water allowing its heat to melt the solid oils vs. doing it separately. Kind of saving the step of actually heating it. I didn't feel confident to just do that this time but maybe next time I will.
Step 4 - Now comes the fun part! Take your spatula and stir stir stir! I stir like I am mixing batter, kind of like the "S" method of stirring. This is where the hand blender works well as you are waiting for the saponification to occur which will change the lye over to soap. This is seen by having a bit of the mixture sit on top for a second before sinking back into itself thus the trace name as just a trace of the mixture sits on the surface - which means it is combined. The hand method takes longer and I believe having the temperature start higher also makes the stirring process take longer. If I had added the oil and lye at a lower temperature I may not have had to stir so long as it is already cooler and will combine easier (just a guess). The hand blender mixes faster of course and will cut the stir time by quite a bit by the videos I have watched on it. I am not planning on becoming a soap manufacturer just making enough for us to use and maybe some gifts, so hand stirring is ok for me right now. So just keep stirring!
Step 5 - So you have trace? Yipee! How does your arm feel? Mine was tired about now and I kept thinking is that it? Is that it? I probably could have stirred longer and kept second guessing but after 1 1/2 hours I was toast! Now it is time to flavor your soap! For my first soap I made the shampoo bar so I added tea tree oil, lavender oil, and lemon oil (since I didn't have grapefruit). It also called for a lot of it - like almost 1 gram of each! My bottles only had like .5 so I added what I had and figured it just won't be that smelly! Give this all a good stir - yup you aren't done yet! Until it is well blended - I did it for another 5 minutes or so. Now it was time to pour the soap into my two silicone bread loaf pans. I should mention here that if you do use something other than silicone for your mold, you will need to line the mold with plastic wrap - this allows you to remove the soap after it has cured easily and keeps the oils from saturating the wood if you are using a wooden mold.
Step 6 - Baking off the soap - Now that the soap is done and you have poured it into a mold you will need to cover it with plastic wrap and I also cut a piece of cardboard the exact size of the loaf pan to act as a lid and add a little more insulation while the soap is curing. I placed the containers on a solid moveable surface (I used a tray) and once the soap was covered I then wrapped the whole thing in the old towels to help keep in the warmth but allow the soap to slowly cool down the rest of the way and set. They need to remain this way for 24 hours to let this process take place. I had mine just on the kitchen counter wrapped up and it was fine.
Step 7 - After the Cure - Now that you waited the 24 hours it is time to remove the soap from the molds and slice to the desired thickness of your bar soap. You can buy soap molds that already have cuts in them that will score the soap, marking it so they are all exactly alike. Or even buy the figure molds that are like the home made chocolate molds that will only need to be popped out and dried. But these can be expensive and really why spend on something that you will only use every once in a while. If you want to make large quantities them maybe the investment will be worth it. My soap is for home so I cut it by eye - I used a french fry cutter for the wavy edges just to give it some "Style".
My soap was kind of solid but still soft almost like cream cheese - spreadable but will still hold it's shape - it held together and when I placed it on the drying racks it was fine it didn't ooze through the surface. It also kept the wavy cut so I figure it is good. No one really says much about consistency when I have watch the videos - as long as it doesn't separate in the mold (oil and water separate) or crumble when you take it out then you did everything right. So now the last and final part of the soap making process.. I hope you are wearing your patient panties today...
Step 8 - The soap needs to dry and finish curing which will take anywhere from 3 - 6 weeks. Say what! Yup you can't use it prior to that as the lye is still active and you need to wait for the rest of the water content to evaporate out of the soap. So you may ask - when do you know it is done? Well, mine is still drying...and the same woman who mixes her oils into her lye water says her sure way of knowing it is done is by tasting it :) LOL I know who wants to taste the soap. But she swears by it. If you just touch the soap with the tip of your tongue and it has no burning sensation at all then the soap is ready. Kind of like if you ever tested a battery with your tongue to check if it was good (come on I know some of you have done this). Same thing kind of - nasty but it won't hurt you. If you really don't want to taste it then I would wait at least the 4 weeks before use as that is the general rule of thumb of how long to wait.
That's it folks! My 8 step process of how to make soap Burrows style. Again I can't guarantee that this process doesn't have flaws in it and my best advice for that would be to please research it for yourself. See what works best for you. I had fun making it and now I have shampoo soap as well as a citronella lavender soap that I think will be fantastic for bug season! This will be great as gifts in a nice little package and I hope that someday soon we can even have our first blog follower giveaway! Stay tuned for that! (ps pictures of the steps will be added once I make another batch - I wasn't that organized the last time I made it to think about taking pictures of each step) sorry :)
