Water can't live without it!
Our well and pump used until the line was installed
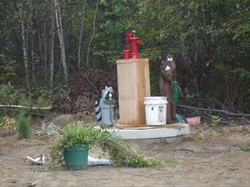
We are blessed with living on a bed of sand that runs from 4-20 feet down before hitting what the locals call grey clay. This means our house is sitting on the largest water filter in the world..(well our world anyways). And there are no rocks! No ledge! Nothing and living in both Vermont and Pennsylvania over the last 20 years where they breed rocks and ledge in the ground, this was unbelievable! Also in Maine you are still allowed to have a hand dug well which actually means a well that can be dug 15-20 feet deep and round cement tiles are placed into the hole acting like an old fashion wishing well. Now not always do you find water, but again our luck was there and we had water at 12 feet. So our three 4 ft high cement tiles were placed and a capped with a large round flat tile. The trick to a closed off well is how do you get the water out without power??? Using an old fashioned water pump of course and I was fortunate to find one in red! What a bargain at $40 at the local hardware store... I love Maine! With a few PVC pipes, fittings and a foot valve we were able to have water any time we needed it!
Now I should mention that it isn't like we went bohemian or anything as we were living within walking distance to both Aunt Carolyn/Uncle Heinz's house as well as Kristina's house in the other direction. So showers were available and thankfully offered so we could wash the grime off when needed. Thankfully no cold showers under a bucket!
When we finished the exterior and most of the insulating was done, we started plumbing the house. With the cost of copper skyrocketing we had a dilemma for our original plan of two bathrooms, kitchen and laundry room as the cost in copper would be way more than we could afford. When looking for alternatives we found PEX a plastic water line. Now plastic isn't the best I know and if cost and time weren't an issue we would have waited but we needed to get it done. Off to our favorite DIY store we went and purchased what we needed to plumb the entire house and for a fraction of the cost. A 100 foot roll of PEX cost about $35, so for under $100 we had all the pipe and fittings needed to plumb the house. What a difference to the over $700+ it was going to cost us in copper! Oh and the best part of PEX is there is no soldering! And it is quick, we had the entire house finished in a few hours!
With the house being ready for water, we now needed to get the water from the well to the house. Not to difficult except that with as cold as it gets here in Maine we needed to make sure our water line is below the frost line in the ground. Here is where we are so happy we have a strapping young man for a son! Let the digging begin... we (yes I did help) dug a trench about 2 feet wide and 4 feet deep from the well to the house, a span of about 30 feet. It was hard but like I explained to Ben we only have to do it once so lets do it right and deep enough. So before long our trench was dug, Jonathan connected it to the well, and wallah we had running water in the house! It was a bit more complicated then that but Jonathan is such a wiz it seemed that simple.
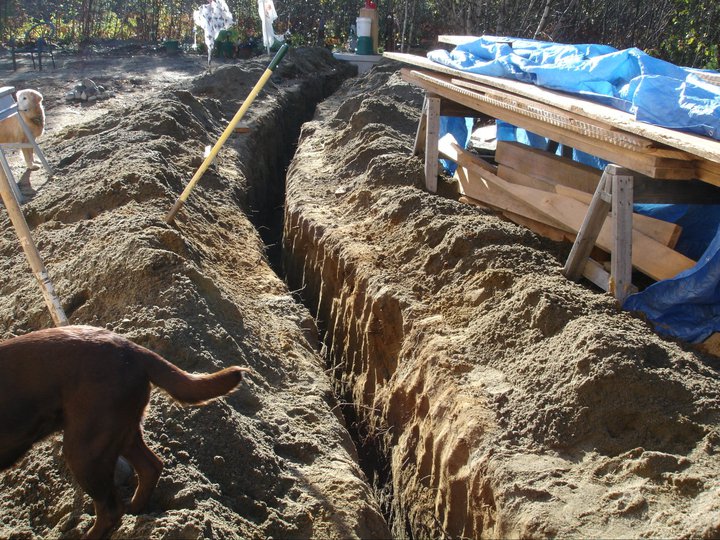
Water line trench - thankfully no rocks!
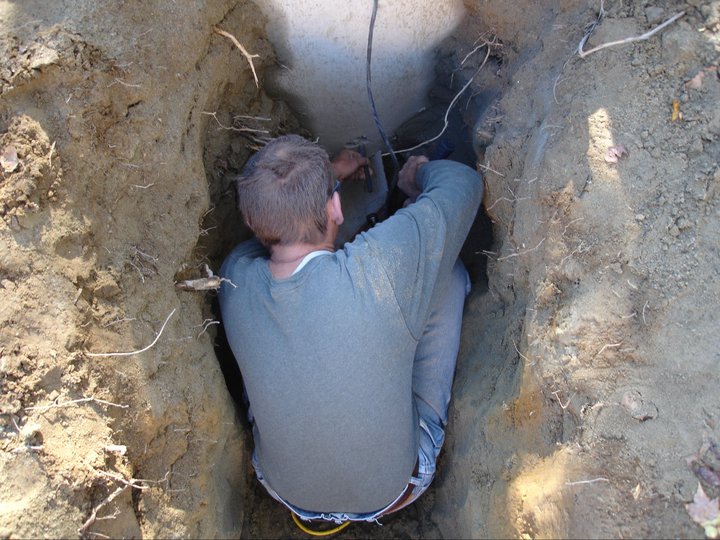
Hooking the water line up into the well
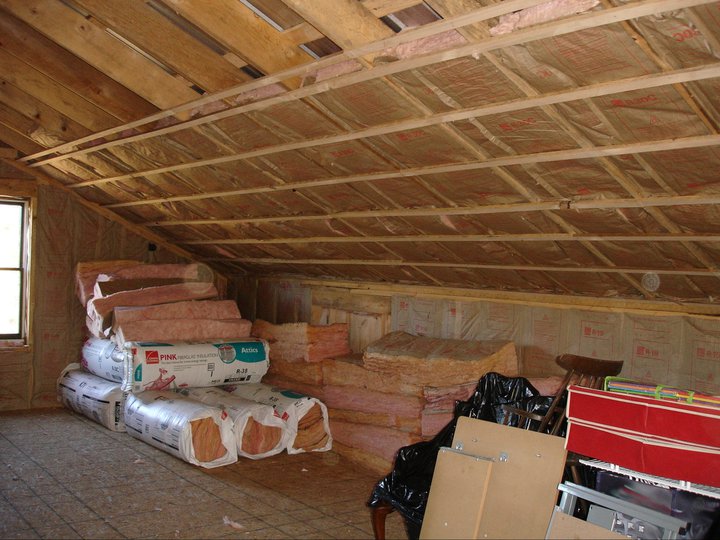
Insulating...one of the most important jobs as well as the nastiest!
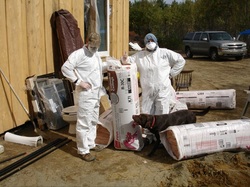
Insulation Dream Team!
You may ask why I chose to put insulating on the same page as utilities... The main reason is because it is such a serious step to home building. In a climate like you find in Maine where the winters are long and cold and the summer can be scorching hot, you need to consider how to keep your home both warm and cool. Easiest most cost effective way? Insulating the heck out of it! And making sure to do it right! Well to say I loved insulating would be a lie. Of all the jobs we did ourselves, personally, this was the worst! We had to go with what we could afford - old fashioned fiberglass insulation. You know the kind with Pink Panther on the side made by Owens Corning. In our construction of the house we decided to go with a thicker 2"x6" wall so we could use a thicker insulation. Thicker means more R value. What is R value? R value is basically a measurement of heat loss through a barrier. If you would like to find out more about R value click on this link: R-Value .
We used the thickest we could for our roof, walls and underneath the main floor. We also opted to insulate the bathroom and utility room walls and ceilings to help reduce the noise of the water pump running, washer/dryer as well as adding a security against freeze-ups. The Roof has an R value of 32, the walls are 19 and the floor is 38. So hopefully we will be toasty warm for many years to come! Insulation isn't hard to put up, but it is itchy and having proper gear on can help alleviate some of the downfalls of using fiberglass. We had full bio-suits (thanks Kristina), face masks so we didn't inhale the fibers, safety glasses to protect particles getting into the eyes, gloves to prevent skin irritation and a staple gun. What is the staple gun for... well the insulation comes in rolls or batts and when you insert it between the frame of the walls, ceiling or floor you have a paper flap that you will need to staple through so that the fiberglass stays where you put it. If not, the chances of it falling or dropping is high. You will also need plastic to place over the insulation on the walls to act as another vapor barrier before attaching the sheet rock. Now I know I am getting ahead of myself as before we insulated we need to run the electric wiring as well as plumbing and gas lines. I am so happy I married a Site and Facility Director who has his own tools!
Now I should continue that little story about when the insulation arrived along with Tropical Storm Earl. As you may remember we had wrapped all the insulation - over $1,500 worth - in plastic and put it all underneath the house thinking it would be protected from the onslaught of rain we had forecasted to hit our area. We had AdvanTech above it - practically impregnable when it comes to rain... what we didn't anticipate was the rivers and ponds that would form when around 4 inches of rain fell. As the next day was the house raising with the roof and siding next, we left the insulation where it was for about a week or so after the storm as we had no where else to put it. Unbeknownst to us, the bottom layer (as we had the packages stacked 3 high) was sitting in a pool of water and absorbing it all. Well no use crying over spilled milk, but ugh what a job. One fact about wet insulation is you do not want to use it and the chances of it drying out completely are slim. We were able to salvage some rolls and batts by slicing off the wet parts but this made the job that much more difficult and time consuming. We were running out of funds so replacing it was impossible. If you use wet insulation, it will mold in your walls thus causing a bio-hazard for your family and we didn't want that. So we did what we could by laying out the damp insulation in the 2nd floor hoping it would dry - some of it actually did dry out which we later used in the floor area or as filler. I guess the lesson here would be to ask the company you purchase the insulation from to hold the delivery until you are ready to hang it. Hindsight is a wonderful thing isn't it?
The roof insulation being hung - we had to add additional strapping to help keep it in place. Piles of drying insulation too!
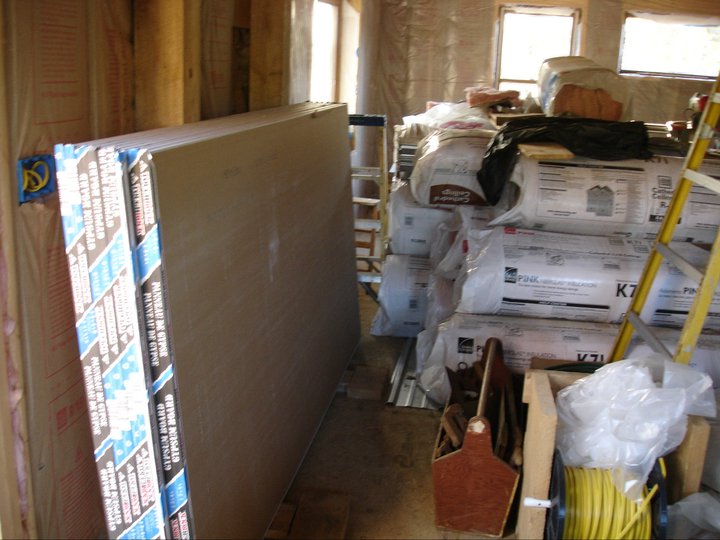
Piles and Piles of insulation that didn't get wet also dry wall (sheet rock/plaster board) for walls
Electric Mayhem...
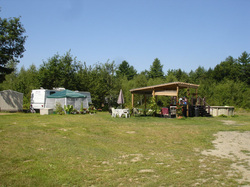
Trailer we lived in during the build
One plus to building your own house is that you are not having to wait for contractors to come to the site to perform the work. Now mind you at this point we were a month and a half into the build and getting tired. The pressure was on to getting into the house as the camper we were living in had no heat or water and winter could come at any minute. So we used every available minute in the day to work on the house - thankfully (or unfortunately) both Jonathan and I were unable to find any employment which left us with this build as our main job - but no income so we were on a tighter and tighter budget everyday.
Now with electrics there are certain codes (guide lines) you must follow. These vary from state to state so make sure if you are going to opt to do your own you find out first what permits or requirements the town or state has for hooking into the grid. In our case, Jonathan was an old pro with electrics and codes so we were set on that. Unfortunately in the state of Maine you have to have a license to sign off on the work before the power company will come in and hook you up. So in time we would need to find an electrician to come in and inspect our work, install a meter box (the power company only supplies the meter) and the main line into the house.
One thing I have not mentioned in all this building was we had no electricity ran to the house. We used a generator for the entire build thanks to our friend Randy who let us borrow one he had. That poor thing ran 8 to 10 hours a day - but we couldn't have done it without it. It ended up pooping the bed when the house was done, but a new motor later we were able to give it back to Randy in working condition again. We ended up buying one of our own in the end which we used for the remainder of the time we had no power.
There was discussion about going off grid and just wiring the house for solar, wind power or both. Isn't that what all homesteaders want? Unfortunately the money for the inverter, panels, turbine, batteries, etc.. was way too much for our budget. So we put that on the back burner and called the power company. Where the house is located is about 1/4 mile off the main road. My cousin Kristina and her family, live beyond us and have power so we would just need one pole to hook into the grid (or so we thought). Well my cousin owned all her poles and if we wanted to hook into them we would literally have to get her permission to use the poles. No problem right? Wrong. The politics of power companies goes something like this: If I use my cousins poles to hook into the power even with her permission, that would make her the owner of a electric company... which she was not allowed to do. So in order for us to hook into the system we had to buy her poles from her (the ones we needed) through the power company which in turn would mean they now owned them and we could hook off of them. Confusing isn't it? Well they came out and gave us an estimate - $7,000!!! We were dumbstruck - we only needed one pole but had to buy 5 others plus the cost for the wire and hook up. We didn't have it so we kept wiring the house and figured in time we would figure out something. Gennie the generator was working very well for us but she was getting very expensive to run. We were paying close to $150-$200 a week in gas (petrol) to run it. But we were stuck so we kept running Gennie. We wired the house without difficulty (well except the hemlock was wicked hard to drill through ugh). When the house was wired we hard wired the generator into it and ran it for when we needed power for tools or lights. Once we finally were able to get the house semi set up we could plug in the refrigerator and would turn the power on for a few hours in the morning and a few at night to keep it cold and the freezer frozen. Feeding a family of 5 we had to have food in stock - I am German we must have food to cook or we can not survive!
In the end we finally bit the bullet and called the power company back and asked them to finalize the cost for us to hook into the grid. When we called it was now February, a new year, and if you can believe they actually had a new program through the state that would now reduce our hook up! In the end we were able to hook into the grid May 2011 for just over $3000. A definite improvement from the original quote! The most amazing part of this whole story is when we finally had the power after living without it for 6 months, using oil lamps for light, limited power to run the water pump so we could shower and do laundry, hanging our laundry in the living room every day to dry clothes... oh and the quiet! We were so used to the roar of the generator running when the lights were on that when we finally had electricity there was no noise what so ever. We would turn them off then on then off again just because we could... Oh and water when you wanted it too! Cold food again! and yes homestead or not I used my electric dryer again! Our family survived without it, but man oh man it was heaven when we had it again. Thank you God for the invention of electricity!
Our best friend - Gennie the Generator is in the back ground - we owe her a lot for all her hard work!
Heating those long winter nights...
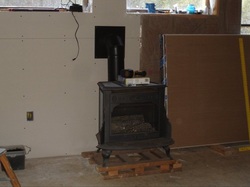
Our Woodstock Soapstone Gas Stove
What to use for heating the house wasn't too much of an issue for us as we were already the proud owners of a Woodstock Soapstone Gas Stove and just planned on installing it. This is an awesome company located right in New Hampshire who have a line of stoves that are made of both soapstone and cast iron. In Vermont we owned an actual woodstove of theirs - The Fireside which we loved but sold with the house when we left. When we moved to Pennsylvania we decided we were done with wood and lets just get a stove in gas! No more wood, no more mess, a lot less work - so we did but found we never used it. We had even tried to sell it but never found a buyer. Now I should mention that it wasn't easy carting the stove about in all our moves as it is really made of stone. So it weighs at least 450 lbs! Not an easy feat until Jonathan made a crate for it. The picture to the left actually shows the stove sitting on what is left of the bottom of the crate. Prior to leaving Pennsylvania, Jonathan purchased an exterior wall vent kit from a local gas company he knew which is all we needed to use it in our new house. So once the walls were sheet rocked, the windows and doors where installed, and the gas lines were run we could install it. We found a great local Gas company and once they delivered our 500 gallon Propane tank, we had heat! OK next to the electricity this was the second best as this meant we also had hot water from our gas hot water heater and a stove with an oven to cook with! Hot showers, Hot food, able to do dishes without boiling water, our hard work was paying off slowly but surely.
Update on Heating Winter 2012
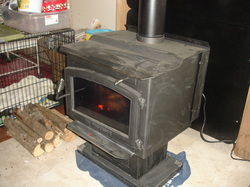
New woodstove installed and running!
We love our gas stove, but seriously the price of Propane is going higher and higher so we decided to think about alternative heating to offset using gas all the time. Earlier I discussed what Maine had a lot of and that was wood. Easy decision was to install a wood stove. We probably would have done this last year if we had the money for the piping but at $100 a 3 foot section for insulated pipe, we needed to save up for both the stove and pipe. We still search the online classified lists and one day found this beauty that a Garden center had bought to heat their greenhouse. Well bad for them but good for us - it didn't work for them. We were able to save almost $800 by buying this second hand but only used 2 weeks! Sweet Deal! So with the money we saved we purchased the pipe we needed, the fire boards to go behind the stove and the tile that we used under the stove. Again I was on my favorite classified sites.. and found someone who had wood for sale. Now wood in the spring should be easy to get as everyone is done burning it for the winter (well almost). But finding seasoned wood is next to impossible! So to find seasoned cut and split wood for $75 a cord we must have stepped in something that day!!! We now are the owners of 8-10 cords of wood which means we are already set for next winters fuel! Top up the gas at the start of the season and we will be home free for the winter.
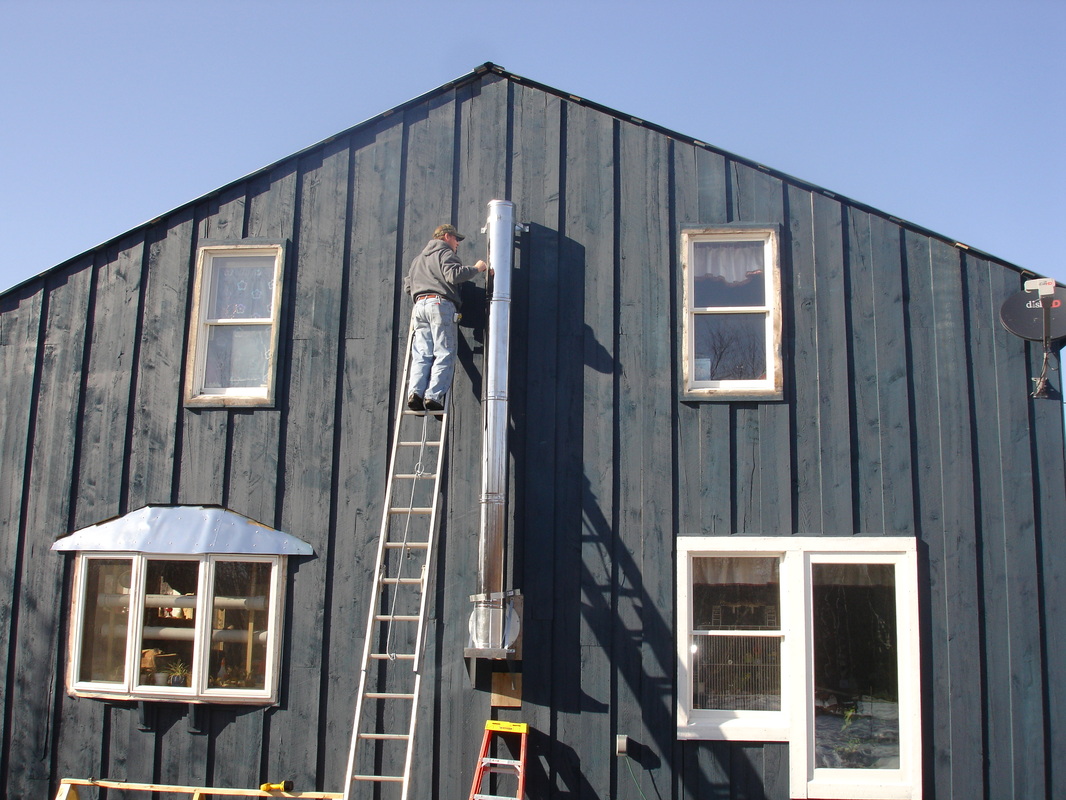
Jonathan installing the insulated pipe to the wood stove
To continue with Building a House - Interior click here
