Double Dip Fried Chicken

Here is a recipe I have been making for about 8 years or so. It is one of Ben's favorites and he asks for it every year for his Birthday dinner. I try to make my kids favorite meal on their special day and it has become a tradition. This isn't the healthiest but what pray tell do I make that is healthy for us LOL! What I love about this fried chicken is you use tenders either breast or thigh meat. In our case I use both as my kids and hubby Jonathan love both white and dark meat. I usually make a great big batch (enough for an army) that way we have left overs in the fridge for snacking on over the next few days. So without further adieu, here it is the long awaited recipe....
Ingredients

Yes another simple ingredient recipe... would you expect anything else from me? Also the recipe below calls for buttermilk. I never remember to buy buttermilk, and I haven't been making my own butter to actually have buttermilk on hand, so I usually take 2 cups of milk and add a couple of tablespoons of vinegar or lemon juice to curdle the milk and create my own buttermilk.
Ingredients
3 to 4 Pounds of boneless skinless chicken meat - white, dark or a combination of both
2 Cups All Purpose Flour
1 Tablespoon Paprika
1 Tablespoon Dried Sage
1 Teaspoon Salt
1 Tablespoon Pepper - fresh ground or whatever you have in your house
2 Cups Buttermilk or the sour milk that I mention above
Oil for frying
This is the combination of spices I use but you can change it up to suit your tastes using dried mustard, garlic, creole spice, hot pepper flakes or whatever your imagination and taste buds are craving. Like a lot of my recipes there is no right or wrong way to do this.
Now I made this already the other day, and didn't take photos of the steps like I usually do, only the finished product. So below has no pictures in the steps but are pretty self explanatory for you to be able to make this on your own. I will be making the recipe again this next weekend and will add the pictures then. Until then it is up to your imagination...
Step 1 - Preparing the chicken
Very simply, take the chicken out of the packages, rinse and trim off any imperfections or fatty bits. Then slice each piece into tender like strips. Some are bigger some are smaller depending on the cut of the piece. I put these all into a bowl and set aside.
Step 2 - Making the Coating and Buttermilk
In a medium sized bowl, mix the flour, salt, pepper and whatever spice combination you intend to flavor the chicken with. Mix this well so that the spices blend in with the flour evenly. In another medium sized bowl, pour the buttermilk or sour milk into it. I know simple so far isn't it?
Step 3 - Double dipping and frying
Now comes the fun part and the messiest part! First heat a frying pan with the oil you are using to fry in over medium heat. You may have to turn this down as you are frying - and you will definitely have to add more oil along the way too!
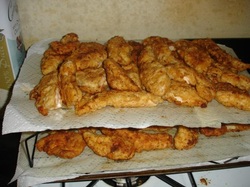
Now take a piece of chicken and place it in the flour, turning to coat all sides. Now dip it into buttermilk coating the whole tender then back into the flour for its final double dip! Then it is into the fry pan and cook it until the chicken begins to whiten about 1/3 of the way up and is golden brown. Flip the piece over and continue cooking on the other side until cooked thoroughly and golden brown. I usually place my cooked pieces on a paper towel lined drying rack (see picture) and place them in a 250 degree F oven. As the pieces cook I add them to the racks in the oven and they all stay warm and can cook a bit longer too. This isn't a crispy coating, more like a soft flavorful coating. I am sure you could crisp it up with a bit of longer frying and not putting it in the oven.
Now take a piece of chicken and place it in the flour, turning to coat all sides. Now dip it into buttermilk coating the whole tender then back into the flour for its final double dip! Then it is into the fry pan and cook it until the chicken begins to whiten about 1/3 of the way up and is golden brown. Flip the piece over and continue cooking on the other side until cooked thoroughly and golden brown. I usually place my cooked pieces on a paper towel lined drying rack (see picture) and place them in a 250 degree F oven. As the pieces cook I add them to the racks in the oven and they all stay warm and can cook a bit longer too. This isn't a crispy coating, more like a soft flavorful coating. I am sure you could crisp it up with a bit of longer frying and not putting it in the oven.
Step 4 - Eat and Enjoy!
Once all the pieces are cooked it is time to eat! I usually make a potato salad and noodle salad to accompany the fried chicken as they are also Ben's favorite. You could even make these ahead of time and freeze for a quick delicious meal when you are in a hurry. We love it anytime of year! Hope you enjoy - let me know if you make this - I would love to know how your family likes it!
